How to Create an Employee Schedule in Google Calendar


Effective employee scheduling is a cornerstone of successful business operations, ensuring that the right people are in the right place at the right time. Proper scheduling boosts productivity, enhances employee satisfaction, and helps maintain compliance with labor laws. Conversely, poor scheduling can lead to understaffing, overworking employees, and operational inefficiencies, ultimately impacting the bottom line.
Google Calendar offers a versatile solution for managing employee schedules. As part of the Google Workspace suite, it integrates seamlessly with other productivity tools, making it easy to coordinate schedules, set reminders, and share calendars. Its user-friendly interface and accessibility from any device with internet access make it an attractive option for businesses of all sizes looking to streamline their scheduling process. While not designed specifically for employee scheduling, Google Calendar’s flexibility and array of features provide a practical approach for businesses seeking a cost-effective and straightforward scheduling tool.
Quick Guide to Creating an Employee Schedule Using Google Calendar
Setting Up a Team Calendar
- Open Google Calendar in your web browser.
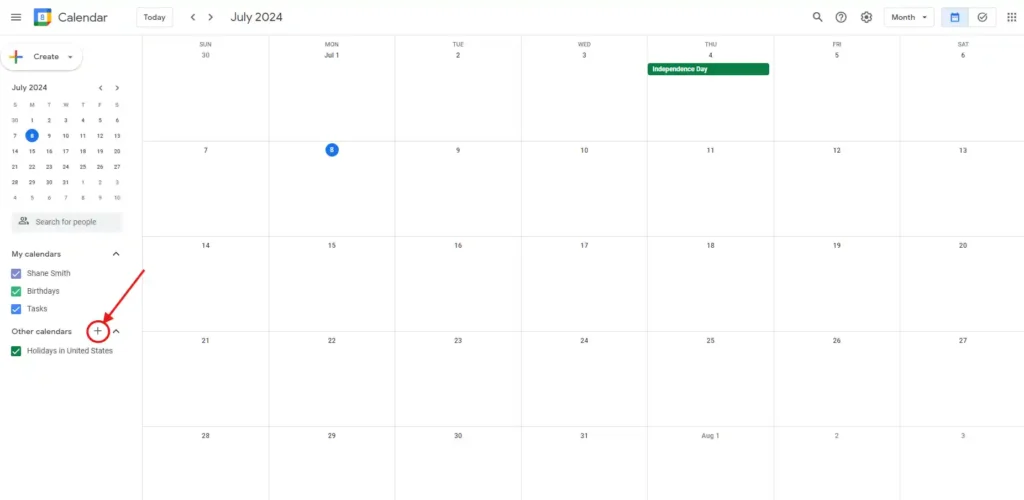
- On the left-hand side, click the “+” button next to “Other calendars.”
- Select “Create new calendar.”
- Name your calendar (e.g., “Employee Schedule”) and add an optional description.
- Choose the appropriate time zone.
- Click “Create Calendar.”
Adding and Managing Events
- Click on a date in your new calendar to create an event.
- Enter the event details, such as the shift name (e.g., “Morning Shift”), start and end times, and any additional notes or descriptions.
- Click “More options” to add location details, attachments, or set the event to repeat for regular shifts.
- Click “Save” to add the event to the calendar.
Sharing the Calendar with Your Team
- On the left side, under “My calendars,” find your newly created calendar.
- Hover over it, click the three vertical dots, and select “Settings and sharing.”
- Under “Share with specific people,” click “Add people.”
- Enter the email addresses of the employees you want to share the calendar with.
- Set the appropriate permissions (e.g., “See all event details” or “Make changes to events”) and click “Send.”
- For broader sharing, under “Access permissions,” you can make the calendar available to your organization or public.
Customizing Calendar Settings
- In the calendar settings, navigate to “Event notifications” to set default notifications for events.
- Customize the notifications to remind employees of their shifts via email or pop-up alerts.
Using Templates and Widgets
- To import a custom schedule template, click on the “Settings” icon (gear icon) and select “Import & export.”
- Follow the instructions to import a .csv file with your schedule template.
- Use Google Calendar widgets to embed the calendar on your company’s intranet or website for easy access.
‘Pro-Tip’
Maximize Visibility with Color Coding: Assign different colors to various shifts, departments, or roles in Google Calendar. This helps employees quickly identify their shifts and reduces confusion.
Benefits of Using Google Calendar for Employee Scheduling
Accessibility and Ease of Use
Google Calendar’s user-friendly interface makes it accessible to individuals with varying levels of technical expertise. The intuitive design allows managers to create, edit, and share schedules effortlessly. Employees can easily view their schedules on any device with internet access, whether it’s a computer, smartphone, or tablet. This flexibility ensures that everyone stays informed about their work hours, even when on the go.
Integration with Other Google Workspace Tools
One of the standout benefits of Google Calendar is its seamless integration with other Google Workspace tools such as Gmail, Google Drive, and Google Meet. This integration allows for efficient scheduling and coordination. For instance, calendar events can be linked with Google Meet for virtual meetings, and attachments from Google Drive can be added to calendar events. This interconnectedness enhances productivity and streamlines communication within the team.
Real-Time Updates and Notifications
Google Calendar provides real-time updates and notifications, ensuring that all team members are aware of any changes to their schedules immediately. When a manager updates an event or shift, notifications are sent instantly to the affected employees. This feature minimizes confusion and ensures that everyone is on the same page. Additionally, customizable reminders help employees stay on top of their schedules, reducing the likelihood of missed shifts or appointments.
Cost-Effectiveness Compared to Dedicated Scheduling Software
Using Google Calendar for employee scheduling is a cost-effective solution, especially for small to medium-sized businesses. As part of the free Google Workspace suite (with additional features available in the paid versions), it offers substantial functionality without the need for expensive software. While dedicated scheduling software may offer advanced features, Google Calendar provides a robust set of tools that can meet the essential scheduling needs of many businesses without the associated costs.
Additional Benefits
- Collaboration: Google Calendar supports collaborative scheduling, allowing multiple users to manage and view the same calendar. This feature is particularly useful for teams working in shifts or departments that need to coordinate their activities closely.
- Customization: Users can customize their calendars with different colors and labels to distinguish between various types of events or shifts. This visual differentiation aids in quickly identifying schedules and understanding the allocation of work hours.
- Security: Google Calendar benefits from Google’s strong security infrastructure, ensuring that your scheduling data is protected. Users can control access permissions, ensuring that sensitive information is only visible to authorized personnel.
‘Pro-Tip’
Set Recurring Events for Consistency: For regular shifts, use the recurring event feature in Google Calendar to automatically schedule repeating shifts. This saves time and ensures consistency.
Editable & Exportable Employee Schedule
| Employee Name | Role | Monday | Tuesday | Wednesday | Thursday | Friday | Saturday | Sunday |
|---|---|---|---|---|---|---|---|---|
| John Ackerman | Manager | 9am - 5pm | 9am - 5pm | 9am - 5pm | 9am - 5pm | 9am - 5pm | Off | Off |
| Jane Lithgo | Regional Manager | 8am - 4pm | 8am - 4pm | 8am - 4pm | 8am - 4pm | 8am - 4pm | Off | Off |
Or you can use our more functional and detailed employee schedule template.
Step-by-Step Guide to Creating an Employee Schedule in Google Calendar
Setting Up a Team Calendar
1. How to Create a New Calendar
Open Google Calendar: Start by opening Google Calendar in your web browser. Ensure you are logged in with the Google account you want to use for scheduling.
Access Calendar Creation: On the left-hand side of the screen, you will see a section titled “Other calendars.” Click the “+” button next to it, and from the drop-down menu, select “Create new calendar.”
2. Naming and Adding a Description to the Calendar
Name Your Calendar: In the “Name” field, enter a descriptive name for your calendar, such as “Employee Schedule” or “Shift Planner.”
Add a Description: Optionally, you can add a description in the “Description” field to provide more context or details about the calendar’s purpose (e.g., “This calendar is used to manage and view employee shifts and schedules”).
3. Selecting the Appropriate Time Zone
- Set the Time Zone: Below the description, you will find the “Time Zone” option. Ensure you select the correct time zone that matches your business operations. This ensures that all scheduled events align correctly with your local time.
4. Creating and Confirming the New Calendar
Create the Calendar: After filling out the necessary information, click the “Create Calendar” button at the bottom of the page.
Confirm Creation: A confirmation message will appear once the calendar is successfully created. You can then click “Back to calendar” or continue to adjust settings and preferences as needed.
Adding and Managing Events
1. Creating Events to Represent Shifts
Create an Event: Click on the date in your calendar where you want to add a shift. A pop-up window will appear for you to create an event.
Enter Event Details: In the “Event” field, enter a name for the shift, such as “Morning Shift” or “Evening Shift.”
2. Adding Details Such as Hours, Locations, and Tasks
Set Shift Hours: Enter the start and end times for the shift in the “Time” fields. You can also specify if the event is all day or if it spans multiple days.
Add Location: If the shift has a specific location, click on the “Location” field and enter the address or location name.
Include Tasks or Notes: Use the “Description” box to add any tasks, notes, or additional information related to the shift. This can include special instructions, required tasks, or any relevant details employees need to know.
3. Recurring Events for Regular Shifts
Set Up Recurring Events: For shifts that occur regularly (e.g., weekly or monthly), click on the “Does not repeat” drop-down menu next to the date and time fields. Select the appropriate recurrence option, such as “Daily,” “Weekly,” or “Custom” to set up a repeating schedule.
Customize Recurrence: Use the custom recurrence settings to specify the frequency, days of the week, and end date for the repeating shifts.
Save the Event: Once all details are entered, click “Save” to add the event to your calendar.
Sharing the Calendar with Your Team
1. Sharing with Individuals: Adding Specific People and Sending Invitations
Open Calendar Settings: On the left side, under “My calendars,” find your newly created calendar. Hover over it, click the three vertical dots, and select “Settings and sharing.”
Add People: Under “Share with specific people,” click “Add people.”
Enter Email Addresses: Enter the email addresses of the employees you want to share the calendar with. You can add multiple email addresses separated by commas.
Set Permissions: Choose the appropriate permission level for each person, such as “See all event details” or “Make changes to events.”
Send Invitations: Click “Send” to invite your employees. They will receive an email invitation with a link to add the calendar to their own Google Calendar.
2. Organization-wide Sharing: Making the Calendar Available to the Entire Organization
Access Permissions: In the calendar settings under “Access permissions,” you have the option to make the calendar available to your entire organization.
Enable Organization Sharing: Check the box next to “Make available for [Your Organization Name].” This will allow anyone in your organization to view the calendar.
Set Visibility: Choose the visibility level, such as “See all event details” or “See only free/busy (hide details),” based on your needs.
3. Public Sharing: Allowing Access via a Public Link
Make Calendar Public: In the “Access permissions” section, check the box next to “Make available to public.” This will make the calendar accessible to anyone with the link.
Share Public Link: Copy the public link provided and share it with anyone who needs access to the calendar. This is useful for sharing schedules with external partners or clients.
Customizing Calendar Settings
1. Adjusting Notification Settings
- Open Calendar Settings: In Google Calendar, click on the gear icon in the top right corner and select “Settings” from the drop-down menu.
- Select Your Calendar: On the left side, under “Settings for my calendars,” click on the name of the calendar you want to adjust.
- Set Event Notifications: Scroll down to the “Event notifications” section. Here, you can set default notifications for all events on this calendar. Click “Add notification” to choose between email or pop-up reminders and set the desired time before the event.
- All-day Event Notifications: You can also set notifications for all-day events in the “All-day event notifications” section.
2. Setting Permissions for Who Can View, Edit, or Add Events
- Access Calendar Sharing Settings: Under the calendar settings, navigate to the “Share with specific people” section.
- Add or Edit Permissions: Click on “Add people” to invite new users or adjust permissions for existing users. You can set different levels of access, such as:
- “See only free/busy (hide details)”
- “See all event details”
- “Make changes to events”
- “Make changes and manage sharing”
- Save Changes: Ensure you click “Save” after adjusting permissions to apply the changes.
3. Using Color Coding for Different Types of Shifts or Departments
- Open Event Details: Click on an event to open its details.
- Change Event Color: Next to the event title, click the color palette icon and select a color for the event. Use different colors to represent various types of shifts, departments, or roles.
- Apply Consistently: Consistently use these colors across the calendar to easily differentiate between shifts and departments.
Using Templates and Widgets
1. Importing Custom Schedule Templates
- Prepare the Template File: Ensure your schedule template is saved in a .csv format.
- Open Import Settings: In Google Calendar, click on the gear icon and select “Settings.”
- Go to Import & Export: On the left side, click on “Import & export.”
- Import the Template: In the “Import” section, click “Select file from your computer” and choose your .csv file. Select the calendar you want to import the events into from the drop-down menu.
- Complete the Import: Click “Import” to add the events from your template to the calendar.
2. Utilizing Widgets for Easier Access and Visibility
Add Google Calendar Widget: If you have a website or intranet, you can embed your Google Calendar for easier access.
- Access Embed Code: In Google Calendar settings, under “Integrate calendar,” find the “Embed code.”
- Customize Appearance: Adjust the embed settings, such as height, width, and color options.
- Copy Embed Code: Copy the provided HTML code.
- Paste on Website: Paste this code into your website’s HTML where you want the calendar to appear.
Use Calendar Widgets on Desktop or Mobile:
- For Desktop: Use browser extensions or applications that offer Google Calendar widgets.
- For Mobile: Add Google Calendar widgets to your smartphone’s home screen for quick access to your schedule.
‘Pro-Tip’
Enable Multiple Notifications: Set multiple notifications for shifts to ensure employees receive timely reminders. Combining email and pop-up notifications can help prevent missed shifts.
Advanced Tips for Effective Scheduling
Best Practices for Shift Planning
1. Plan Ahead:
- Set a Regular Schedule: Establish a consistent timeline for creating and sharing schedules, such as a month or a week in advance. This helps employees plan their personal lives around their work commitments.
- Consider Peak Times: Identify and plan for peak business hours or seasons by scheduling additional staff during these periods to ensure smooth operations.
- Balance Workloads: Distribute shifts evenly among employees to avoid overworking some while underutilizing others. Use rotation systems to ensure fairness.
2. Involve Employees in the Scheduling Process:
- Request Preferences: Collect employees’ preferred working hours and days off to accommodate their needs as much as possible.
- Use a Collaborative Approach: Encourage employees to swap shifts among themselves with management approval to maintain flexibility and meet personal commitments.
3. Use Data for Decision Making:
- Analyze Historical Data: Review past schedules to identify patterns and make informed decisions about staffing levels.
- Monitor Performance: Track productivity and attendance records to adjust future schedules accordingly.
Managing Employee Availability and Time-Off Requests
1. Collect Availability Information:
- Create an Availability Form: Use Google Forms or a similar tool to gather employees’ availability on a regular basis.
- Update Regularly: Request updates from employees to ensure you have the most current availability information.
2. Implement a Time-Off Request Process:
- Establish Clear Policies: Define how and when employees should submit time-off requests, including deadlines and required documentation.
- Use Shared Calendars: Create a separate calendar for tracking time-off requests, ensuring visibility and avoiding conflicts.
3. Automate Approvals:
- Set Up Rules: Use Google Calendar’s notification and event settings to automate approval processes for time-off requests that meet predefined criteria.
- Notify Employees: Ensure employees receive confirmation of their approved time-off requests through email or calendar notifications.
Communicating Schedule Changes Effectively
1. Use Multiple Communication Channels:
- Email Notifications: Send email notifications for any schedule changes to ensure employees receive timely updates.
- In-App Notifications: Utilize Google Calendar’s built-in notification system to alert employees of changes directly within the app.
2. Provide Clear and Detailed Information:
- Include All Relevant Details: When communicating changes, provide comprehensive information such as new shift times, locations, and any special instructions.
- Use Standardized Templates: Develop standardized templates for communicating schedule changes to maintain consistency and clarity.
3. Encourage Feedback and Confirmation:
- Request Acknowledgment: Ask employees to confirm receipt of schedule changes to ensure they are aware of their updated shifts.
- Solicit Feedback: Encourage employees to provide feedback on the scheduling process to identify areas for improvement.
‘Pro-Tip’
Integrate with Google Meet for Meetings: Link shifts or important events with Google Meet for virtual meetings. This integration simplifies coordination and keeps everything in one place.
Limitations of Google Calendar for Employee Scheduling
Lack of Built-in Employee Management Features
1. No Employee Profiles:
- Limited Information Storage: Google Calendar does not offer a system for maintaining detailed employee profiles, such as contact information, job roles, and skill sets.
- Manual Tracking: Managers must manually track and manage employee details outside of the calendar, leading to potential inefficiencies.
2. Absence of Shift Bidding and Self-Scheduling:
- No Shift Bidding: Google Calendar lacks a built-in feature for shift bidding, where employees can request preferred shifts.
- Limited Self-Scheduling: Employees cannot independently select or swap shifts within the calendar, requiring additional coordination.
No Direct Communication Tools for Schedule Changes
1. Lack of Integrated Messaging:
- No Chat Functionality: Google Calendar does not provide an integrated messaging or chat function for real-time communication regarding schedule changes.
- Separate Communication Channels: Managers and employees must rely on external tools like email, instant messaging, or phone calls for schedule-related communications.
2. Delayed Notifications:
- Potential Delays: Email and calendar notifications may be subject to delays, causing potential miscommunication about urgent schedule changes.
- Dependency on Third-Party Tools: To facilitate faster communication, managers may need to use third-party tools, adding complexity to the scheduling process.
Limited Reporting and Analytics Capabilities
1. Basic Reporting:
- Minimal Insights: Google Calendar offers limited reporting capabilities, providing basic information such as event counts and calendar views.
- Manual Data Extraction: Managers must manually extract data for more in-depth analysis, increasing the administrative burden.
2. No Advanced Analytics:
- Lack of Comprehensive Metrics: The calendar does not support advanced analytics, such as labor cost tracking, overtime analysis, or employee performance metrics.
- External Tools Required: To gain deeper insights, businesses need to integrate Google Calendar with external analytics and reporting tools, complicating the workflow.
‘Pro-Tip’
Use Descriptions for Clarity: Add detailed descriptions to shifts in Google Calendar, including tasks, special instructions, and contact information. This ensures employees have all the necessary details at their fingertips.
Alternative Scheduling Solutions
Overview of Dedicated Scheduling Software
Dedicated scheduling software is designed specifically to manage employee schedules, offering advanced features and tools to streamline the scheduling process. These solutions provide a more comprehensive approach to workforce management, addressing the limitations of general-purpose tools like Google Calendar. Key features of dedicated scheduling software typically include:
- Automated Scheduling: Automatically create optimized schedules based on employee availability, skills, and business needs.
- Shift Management: Easily manage shift changes, swaps, and cover requests within the software.
- Communication Tools: Integrated messaging and notification systems to keep employees informed of schedule changes in real-time.
- Employee Self-Service: Allow employees to view, request, and swap shifts on their own.
- Reporting and Analytics: Generate detailed reports on labor costs, attendance, overtime, and other key metrics.
- Integration: Seamlessly integrate with other HR and payroll systems for a holistic approach to employee management.
Comparison of Features Between Google Calendar and Specialized Tools
| Feature | Google Calendar | Dedicated Scheduling Software |
|---|---|---|
| Ease of Use | User-friendly interface | Varies, but often designed for easy use |
| Automated Scheduling | Manual scheduling required | Automated based on custom rules |
| Shift Management | Manual updates | Automated shift changes and swaps |
| Communication Tools | Limited to email and pop-ups | Integrated messaging and notifications |
| Employee Self-Service | Limited capabilities | Robust self-service options |
| Reporting and Analytics | Basic event counts | Detailed reports and analytics |
| Integration | Integrates with Google Workspace | Integrates with HR, payroll, and other systems |
| Cost | Free with basic features | Varies, often subscription-based |
While Google Calendar is a versatile tool that can be adapted for scheduling, dedicated scheduling software provides a more tailored and efficient solution for businesses with complex scheduling needs.
Introduction to TimeTrex as a Comprehensive Scheduling Solution
TimeTrex is a comprehensive scheduling software solution designed to meet the diverse needs of businesses of all sizes. It offers a range of features that streamline employee scheduling, time tracking, payroll, and overall workforce management. TimeTrex is available as both a web and mobile app, ensuring accessibility and convenience.
Key Features:
- Automated Scheduling: Automatically create optimized schedules based on employee availability, skills, and business requirements.
- Shift Management: Easily manage shift changes, swaps, and cover requests with real-time updates and notifications.
- Employee Self-Service: Employees can view their schedules, request time off, and swap shifts directly through the app.
- Integrated Communication: Built-in messaging tools ensure seamless communication between managers and employees.
- Advanced Reporting and Analytics: Generate detailed reports on labor costs, attendance, overtime, and other critical metrics to inform decision-making.
- Seamless Integration: Integrate with HR, payroll, and other business systems for a unified approach to workforce management.
Benefits of Using TimeTrex:
- Efficiency: Save time and reduce administrative workload with automated scheduling and streamlined processes.
- Accuracy: Minimize errors and ensure compliance with labor laws through accurate time tracking and reporting.
- Employee Satisfaction: Empower employees with self-service options and transparent communication, leading to higher job satisfaction.
- Scalability: Suitable for businesses of all sizes, from small startups to large enterprises.
Disclaimer: The content provided on this webpage is for informational purposes only and is not intended to be a substitute for professional advice. While we strive to ensure the accuracy and timeliness of the information presented here, the details may change over time or vary in different jurisdictions. Therefore, we do not guarantee the completeness, reliability, or absolute accuracy of this information. The information on this page should not be used as a basis for making legal, financial, or any other key decisions. We strongly advise consulting with a qualified professional or expert in the relevant field for specific advice, guidance, or services. By using this webpage, you acknowledge that the information is offered “as is” and that we are not liable for any errors, omissions, or inaccuracies in the content, nor for any actions taken based on the information provided. We shall not be held liable for any direct, indirect, incidental, consequential, or punitive damages arising out of your access to, use of, or reliance on any content on this page.
About The Author

Roger Wood
With a Baccalaureate of Science and advanced studies in business, Roger has successfully managed businesses across five continents. His extensive global experience and strategic insights contribute significantly to the success of TimeTrex. His expertise and dedication ensure we deliver top-notch solutions to our clients around the world.
Time To Clock-In
Start your 30-day free trial!
Experience the Ultimate Workforce Solution and Revolutionize Your Business Today
- Eliminate Errors
- Simple & Easy To Use
- Real-time Reporting
Saving businesses time and money through better workforce management since 2003.
Copyright © 2025 TimeTrex. All Rights Reserved.